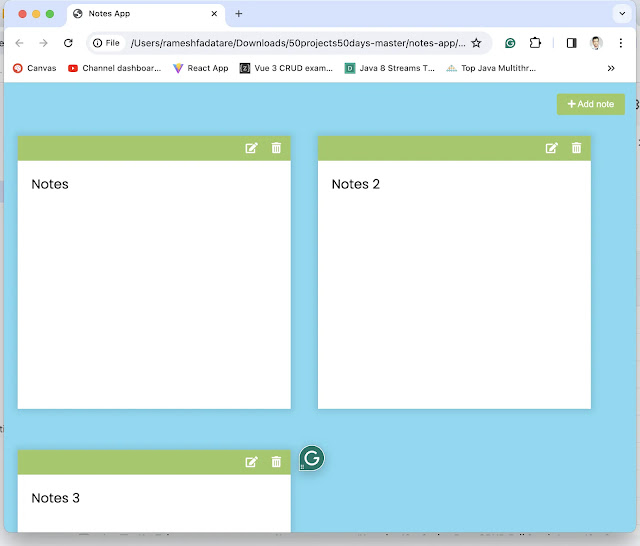
In this tutorial, we'll build a simple yet functional notes application using JavaScript, HTML, and CSS. This app will allow users to add, edit, and delete notes directly from their web browser. Moreover, it utilizes the browser's local storage to persist notes between sessions, ensuring that your notes remain saved even after you close the browser. Let's dive into the steps and code necessary to create this application.
The HTML is straightforward, consisting of a button to add new notes and a script inclusion for the marked.js library, which allows us to use markdown in our notes.
Overview of the Application
The notes app is designed to be user-friendly, featuring a clean and minimalistic UI. Users can create new notes with a single click, edit them in markdown format, and delete them if necessary. The app makes use of the localStorage API to store notes data, making it a perfect tool for jotting down thoughts, to-do lists, or any important information.Project Setup
Create a Project Directory: Name it notes-app. This will organize your project files.
File Structure:
- index.html: Contains the markup for the application.
- style.css: Styles the application.
- script.js: Contains the logic notes application.
Development Steps
1. HTML Markup (index.html)
Let's open the index.html file and add the following code to it:
<!DOCTYPE html>
<html lang="en">
  <head>
    <meta charset="UTF-8" />
    <meta name="viewport" content="width=device-width, initial-scale=1.0" />
    <link rel="stylesheet" href="https://cdnjs.cloudflare.com/ajax/libs/font-awesome/5.14.0/css/all.min.css" integrity="sha512-1PKOgIY59xJ8Co8+NE6FZ+LOAZKjy+KY8iq0G4B3CyeY6wYHN3yt9PW0XpSriVlkMXe40PTKnXrLnZ9+fkDaog==" crossorigin="anonymous" />
    <link rel="stylesheet" href="style.css" />
    <title>Notes App</title>
  </head>
  <body>
    <button class="add" id="add">
      <i class="fas fa-plus"></i> Add note
    </button>

    <script src="https://cdnjs.cloudflare.com/ajax/libs/marked/1.2.2/marked.min.js"></script>
    <script src="script.js"></script>
  </body>
</html>
2. style.css - CSS Styling
The CSS uses the Poppins font from Google Fonts to ensure readability and aesthetics. We apply a background color and use Flexbox to wrap notes neatly. Each note, along with the add button, has been styled to stand out and be easily accessible.
Let's open the style.css file and add the following CSS code to it:
@import url('https://fonts.googleapis.com/css2?family=Poppins:wght@200;400&display=swap');

* {
  box-sizing: border-box;
  outline: none;
}

body {
  background-color: #7bdaf3;
  font-family: 'Poppins', sans-serif;
  display: flex;
  flex-wrap: wrap;
  margin: 0;
  padding-top: 3rem;
}

.add {
  position: fixed;
  top: 1rem;
  right: 1rem;
  background-color: #9ec862;
  color: #fff;
  border: none;
  border-radius: 3px;
  padding: 0.5rem 1rem;
  cursor: pointer;
}

.add:active {
  transform: scale(0.98);
}

.note {
  background-color: #fff;
  box-shadow: 0 0 10px 4px rgba(0, 0, 0, 0.1);
  margin: 30px 20px;
  height: 400px;
  width: 400px;
  overflow-y: scroll;
}

.note .tools {
  background-color: #9ec862;
  display: flex;
  justify-content: flex-end;
  padding: 0.5rem;
}

.note .tools button {
  background-color: transparent;
  border: none;
  color: #fff;
  cursor: pointer;
  font-size: 1rem;
  margin-left: 0.5rem;
}

.note textarea {
  outline: none;
  font-family: inherit;
  font-size: 1.2rem;
  border: none;
  height: 400px;
  width: 100%;
  padding: 20px;
}

.main {
  padding: 20px;
}

.hidden {
  display: none;
}
3. script.js - JavaScript Functionality
The core functionality of the app is handled with JavaScript. Here's a breakdown of the main functionalities:
Adding a New Note: When the "Add note" button is clicked, a new note is created with editable and viewable states. This allows users to switch between editing and viewing the markdown-rendered content.
Editing and Deleting Notes: Each note comes with its own set of edit and delete buttons. Users can toggle between the markdown text area and the rendered HTML view to update their notes or delete them entirely.
Local Storage: The app uses the localStorage API to store and retrieve notes. Whenever a note is added, edited, or deleted, the changes are reflected in the local storage, ensuring data persistence.
Markdown Support: The app supports markdown syntax, integrating the marked.js library, allowing for more expressive and formatted notes.
Let's open the script.js file and add the following JavaScript code to it:
const addBtn = document.getElementById('add')

const notes = JSON.parse(localStorage.getItem('notes'))

if(notes) {
    notes.forEach(note => addNewNote(note))
}

addBtn.addEventListener('click', () => addNewNote())

function addNewNote(text = '') {
    const note = document.createElement('div')
    note.classList.add('note')

    note.innerHTML = `
    <div class="tools">
        <button class="edit"><i class="fas fa-edit"></i></button>
        <button class="delete"><i class="fas fa-trash-alt"></i></button>
    </div>

    <div class="main ${text ? "" : "hidden"}"></div>
    <textarea class="${text ? "hidden" : ""}"></textarea>
    `

    const editBtn = note.querySelector('.edit')
    const deleteBtn = note.querySelector('.delete')
    const main = note.querySelector('.main')
    const textArea = note.querySelector('textarea')

    textArea.value = text
    main.innerHTML = marked(text)

    deleteBtn.addEventListener('click', () => {
        note.remove()

        updateLS()
    })

    editBtn.addEventListener('click', () => {
        main.classList.toggle('hidden')
        textArea.classList.toggle('hidden')
    })

    textArea.addEventListener('input', (e) => {
        const { value } = e.target

        main.innerHTML = marked(value)

        updateLS()
    })

    document.body.appendChild(note)
}

function updateLS() {
    const notesText = document.querySelectorAll('textarea')

    const notes = []

    notesText.forEach(note => notes.push(note.value))

    localStorage.setItem('notes', JSON.stringify(notes))
}
Open index.html in Browser
Let's open the index.html file in the browser, and you will be able to see the following screen:
Conclusion
Building a Notes app is a great project for beginners looking to improve their web development skills. It touches upon essential concepts such as DOM manipulation, event handling, local storage, and third-party libraries. By following this tutorial, you'll not only end up with a functional web application but also gain valuable insights into the practical aspects of HTML, CSS, and JavaScript programming.
Whether you're a student, a professional, or someone who loves jotting down ideas, this Notes app can become a handy tool in your daily life. Moreover, the project provides a solid foundation upon which you can build more complex features, such as categorizing notes, searching through content, or even sharing notes online. Happy coding!


Comments
Post a Comment
Leave Comment