📘 Premium Read: Access my best content on Medium member-only articles — deep dives into Java, Spring Boot, Microservices, backend architecture, interview preparation, career advice, and industry-standard best practices.
🎓 Top 15 Udemy Courses (80-90% Discount): My Udemy Courses - Ramesh Fadatare — All my Udemy courses are real-time and project oriented courses.
▶️ Subscribe to My YouTube Channel (176K+ subscribers): Java Guides on YouTube
▶️ For AI, ChatGPT, Web, Tech, and Generative AI, subscribe to another channel: Ramesh Fadatare on YouTube
Learn spring boot at https://www.javaguides.net/p/spring-boot-tutorial.html.
Learn Hibernate at https://www.javaguides.net/p/hibernate-tutorial.html
Learn Spring Data JPA at https://www.javaguides.net/p/spring-data-jpa-tutorial.html
Video Tutorial
Project Requirements
- Get all the employees
- Add a new employee
- Update an employee
- Delete an employee
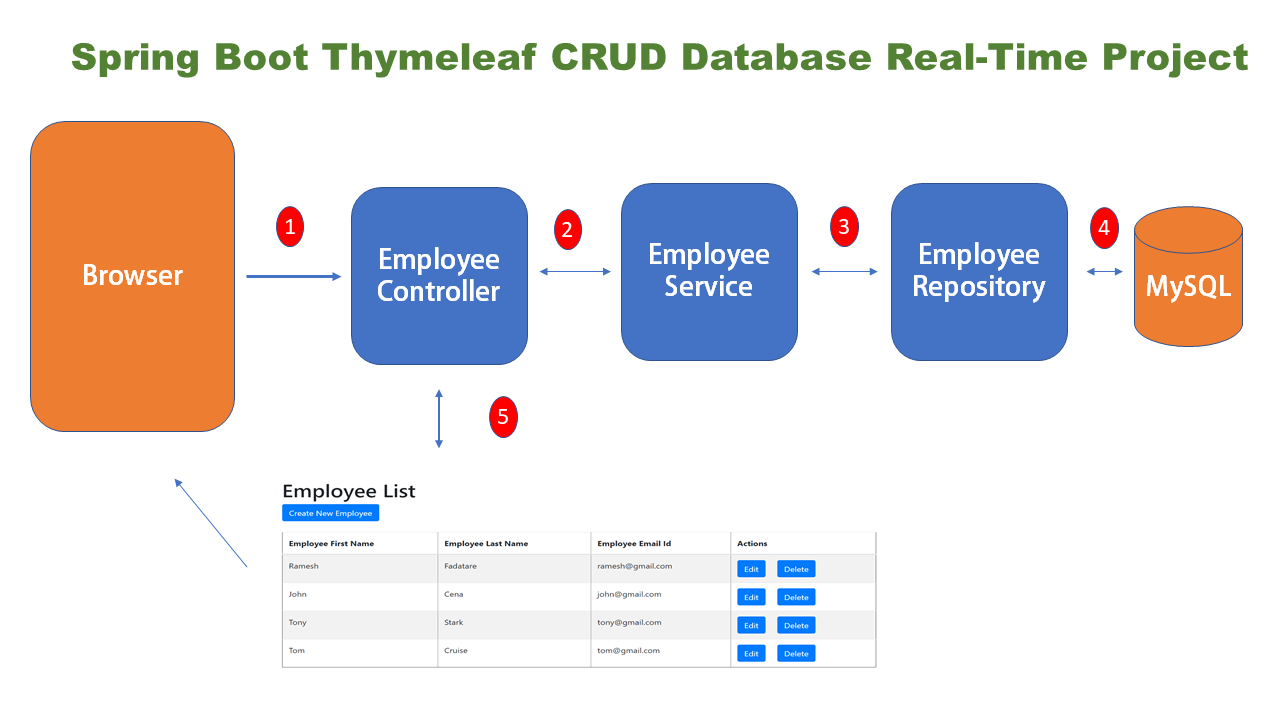
What we will build?
Application Flow
Tools and technologies used
- IDE - Eclipse / STS
- Spring Boot 3+
- Spring Framework 6+
- Maven
- Java 17
- Spring Data JPA ( Hibernate)
- Thymeleaf
1. Create Spring Boot Project
2. Maven Dependencies
        <dependency>
            <groupId>org.springframework.boot</groupId>
            <artifactId>spring-boot-starter-data-jpa</artifactId>
        </dependency>
        <dependency>
            <groupId>org.springframework.boot</groupId>
            <artifactId>spring-boot-starter-thymeleaf</artifactId>
        </dependency>
        <dependency>
            <groupId>org.springframework.boot</groupId>
            <artifactId>spring-boot-starter-web</artifactId>
        </dependency>
        <dependency>
            <groupId>org.springframework.boot</groupId>
            <artifactId>spring-boot-devtools</artifactId>
            <scope>runtime</scope>
            <optional>true</optional>
        </dependency>
        <dependency>
            <groupId>com.mysql</groupId>
            <artifactId>mysql-connector-j</artifactId>
            <scope>runtime</scope>
        </dependency>
3. Project Structure
4. Configure and Setup MySQL Database
# DATASOURCE (DataSourceAutoConfiguration & DataSourceProperties)
spring.datasource.url=jdbc:mysql://localhost:3306/demo?useSSL=false&serverTimezone=UTC&useLegacyDatetimeCode=false
spring.datasource.username=root
spring.datasource.password=root

# Hibernate

# The SQL dialect makes Hibernate generate better SQL for the chosen database
spring.jpa.properties.hibernate.dialect = org.hibernate.dialect.MySQLDialect

# Hibernate ddl auto (create, create-drop, validate, update)
spring.jpa.hibernate.ddl-auto = update

logging.level.org.hibernate.SQL=DEBUG
logging.level.org.hibernate.type=TRACE
5. Model Layer - Create JPA Entity - Employee.java
package net.javaguides.springboot.model;

import jakarta.persistence.*;

@Entity
@Table(name = "employees")
public class Employee {

    @Id
    @GeneratedValue(strategy = GenerationType.IDENTITY)
    private long id;

    @Column(name = "first_name")
    private String firstName;

    @Column(name = "last_name")
    private String lastName;

    @Column(name = "email")
    private String email;
    public long getId() {
        return id;
    }
    public void setId(long id) {
        this.id = id;
    }
    public String getFirstName() {
        return firstName;
    }
    public void setFirstName(String firstName) {
        this.firstName = firstName;
    }
    public String getLastName() {
        return lastName;
    }
    public void setLastName(String lastName) {
        this.lastName = lastName;
    }
    public String getEmail() {
        return email;
    }
    public void setEmail(String email) {
        this.email = email;
    }
}
6. Repository Layer - EmployeeRepository.java
package net.javaguides.springboot.repository;

import org.springframework.data.jpa.repository.JpaRepository;
import org.springframework.stereotype.Repository;

import net.javaguides.springboot.model.Employee;

@Repository
public interface EmployeeRepository extends JpaRepository<Employee, Long>{

}
7. Service Layer
7.1 EmployeeService.java interface
package net.javaguides.springboot.service;

import java.util.List;

import net.javaguides.springboot.model.Employee;

public interface EmployeeService {
    List < Employee > getAllEmployees();
    void saveEmployee(Employee employee);
    Employee getEmployeeById(long id);
    void deleteEmployeeById(long id);
}
7.2. EmployeeServiceImpl class
package net.javaguides.springboot.service;

import java.util.List;
import java.util.Optional;

import org.springframework.beans.factory.annotation.Autowired;
import org.springframework.stereotype.Service;

import net.javaguides.springboot.model.Employee;
import net.javaguides.springboot.repository.EmployeeRepository;

@Service
public class EmployeeServiceImpl implements EmployeeService {

    @Autowired
    private EmployeeRepository employeeRepository;

    @Override
    public List < Employee > getAllEmployees() {
        return employeeRepository.findAll();
    }

    @Override
    public void saveEmployee(Employee employee) {
        this.employeeRepository.save(employee);
    }

    @Override
    public Employee getEmployeeById(long id) {
        Optional < Employee > optional = employeeRepository.findById(id);
        Employee employee = null;
        if (optional.isPresent()) {
            employee = optional.get();
        } else {
            throw new RuntimeException(" Employee not found for id :: " + id);
        }
        return employee;
    }

    @Override
    public void deleteEmployeeById(long id) {
        this.employeeRepository.deleteById(id);
    }
}
8. Controller Layer - EmployeeController.java
package net.javaguides.springboot.controller;

import org.springframework.beans.factory.annotation.Autowired;
import org.springframework.stereotype.Controller;
import org.springframework.ui.Model;
import org.springframework.web.bind.annotation.GetMapping;
import org.springframework.web.bind.annotation.ModelAttribute;
import org.springframework.web.bind.annotation.PathVariable;
import org.springframework.web.bind.annotation.PostMapping;

import net.javaguides.springboot.model.Employee;
import net.javaguides.springboot.service.EmployeeService;

@Controller
public class EmployeeController {

    @Autowired
    private EmployeeService employeeService;

    // display list of employees
    @GetMapping("/")
    public String viewHomePage(Model model) {
        model.addAttribute("listEmployees", employeeService.getAllEmployees());
        return "index";
    }

    @GetMapping("/showNewEmployeeForm")
    public String showNewEmployeeForm(Model model) {
        // create model attribute to bind form data
        Employee employee = new Employee();
        model.addAttribute("employee", employee);
        return "new_employee";
    }

    @PostMapping("/saveEmployee")
    public String saveEmployee(@ModelAttribute("employee") Employee employee) {
        // save employee to database
        employeeService.saveEmployee(employee);
        return "redirect:/";
    }

    @GetMapping("/showFormForUpdate/{id}")
    public String showFormForUpdate(@PathVariable(value = "id") long id, Model model) {

        // get employee from the service
        Employee employee = employeeService.getEmployeeById(id);

        // set employee as a model attribute to pre-populate the form
        model.addAttribute("employee", employee);
        return "update_employee";
    }

    @GetMapping("/deleteEmployee/{id}")
    public String deleteEmployee(@PathVariable(value = "id") long id) {

        // call delete employee method
        this.employeeService.deleteEmployeeById(id);
        return "redirect:/";
    }
}
9. View Layer
9.1 index.html
<!DOCTYPE html>
<html lang="en" xmlns:th="http://www.thymeleaf.org">

<head>
    <meta charset="ISO-8859-1">
    <title>Employee Management System</title>

    <link rel="stylesheet" href="https://stackpath.bootstrapcdn.com/bootstrap/4.1.3/css/bootstrap.min.css" integrity="sha384-MCw98/SFnGE8fJT3GXwEOngsV7Zt27NXFoaoApmYm81iuXoPkFOJwJ8ERdknLPMO" crossorigin="anonymous">

</head>

<body>

    <div class="container my-2">
        <h1>Employees List</h1>

        <a th:href="@{/showNewEmployeeForm}" class="btn btn-primary btn-sm mb-3"> Add Employee </a>

        <table border="1" class="table table-striped table-responsive-md">
            <thead>
                <tr>
                    <th>Employee First Name</th>
                    <th>Employee Last Name</th>
                    <th>Employee Email</th>
                    <th> Actions </th>
                </tr>
            </thead>
            <tbody>
                <tr th:each="employee : ${listEmployees}">
                    <td th:text="${employee.firstName}"></td>
                    <td th:text="${employee.lastName}"></td>
                    <td th:text="${employee.email}"></td>
                    <td> <a th:href="@{/showFormForUpdate/{id}(id=${employee.id})}" class="btn btn-primary">Update</a>
                        <a th:href="@{/deleteEmployee/{id}(id=${employee.id})}" class="btn btn-danger">Delete</a>
                    </td>
                </tr>
            </tbody>
        </table>
    </div>
</body>

</html>
9.2 new_employee.html
<!DOCTYPE html>
<html lang="en" xmlns:th="http://www.thymeleaf.org">

<head>
    <meta charset="ISO-8859-1">
    <title>Employee Management System</title>
    <link rel="stylesheet" href="https://stackpath.bootstrapcdn.com/bootstrap/4.1.3/css/bootstrap.min.css" integrity="sha384-MCw98/SFnGE8fJT3GXwEOngsV7Zt27NXFoaoApmYm81iuXoPkFOJwJ8ERdknLPMO" crossorigin="anonymous">
</head>

<body>
    <div class="container">
        <h1>Employee Management System</h1>
        <hr>
        <h2>Save Employee</h2>

        <form action="#" th:action="@{/saveEmployee}" th:object="${employee}" method="POST">
            <input type="text" th:field="*{firstName}" placeholder="Employee First Name" class="form-control mb-4 col-4">

            <input type="text" th:field="*{lastName}" placeholder="Employee Last Name" class="form-control mb-4 col-4">

            <input type="text" th:field="*{email}" placeholder="Employee Email" class="form-control mb-4 col-4">

            <button type="submit" class="btn btn-info col-2"> Save Employee</button>
        </form>

        <hr>

        <a th:href="@{/}"> Back to Employee List</a>
    </div>
</body>

</html>
9.3 update_employee.html
<!DOCTYPE html>
<html lang="en" xmlns:th="http://www.thymeleaf.org">

<head>
    <meta charset="ISO-8859-1">
    <title>Employee Management System</title>

    <link rel="stylesheet" href="https://stackpath.bootstrapcdn.com/bootstrap/4.1.3/css/bootstrap.min.css" integrity="sha384-MCw98/SFnGE8fJT3GXwEOngsV7Zt27NXFoaoApmYm81iuXoPkFOJwJ8ERdknLPMO" crossorigin="anonymous">
</head>

<body>
    <div class="container">
        <h1>Employee Management System</h1>
        <hr>
        <h2>Update Employee</h2>

        <form action="#" th:action="@{/saveEmployee}" th:object="${employee}" method="POST">

            <!-- Add hidden form field to handle update -->
            <input type="hidden" th:field="*{id}" />

            <input type="text" th:field="*{firstName}" class="form-control mb-4 col-4">

            <input type="text" th:field="*{lastName}" class="form-control mb-4 col-4">

            <input type="text" th:field="*{email}" class="form-control mb-4 col-4">

            <button type="submit" class="btn btn-info col-2"> Update Employee</button>
        </form>

        <hr>

        <a th:href="@{/}"> Back to Employee List</a>
    </div>
</body>

</html>
10. Run Spring application and demo
$ mvn spring-boot:runDemo
List Employees Page
Update Employee Page
Add Employee Page
GitHub Repository Link
You can download/clone source code of this tutorial from my GitHub repository at https://github.com/RameshMF/springboot-thymeleaf-crud-pagination-sorting-webapp.git
Further Readings
Pagination and Sorting with Spring Boot, ThymeLeaf, Spring Data JPA, Hibernate, MySQL


![[NEW] Full-Stack Java Development with Spring Boot 3 & React Build 5 Spring Boot Projects with Java: Line-by-Line Coding](https://img-c.udemycdn.com/course/750x422/5338984_4d3a_5.jpg)


Comments
Post a Comment
Leave Comment