This article is a series of Servlet tutorials. In this article, we will build a simple Employee Registration module using Servlet, JDBC, and the MySQL database.
Learn complete Servlet at https://www.javaguides.net/p/servlet-tutorial.html
Notice that in this article, we are not using JSP to develop a web application. If you want to use JSP and servlet together then check out the below tutorials:
In this example, we will write the JDBC code separate from the Servlet. Servlet file we will be used only for handling HTTP requests and business logic. We use the JDBC API to connect to the MySQL database.
You can download the source code of this article from my GitHub repository. The link has given at end of this article.
What we will build?
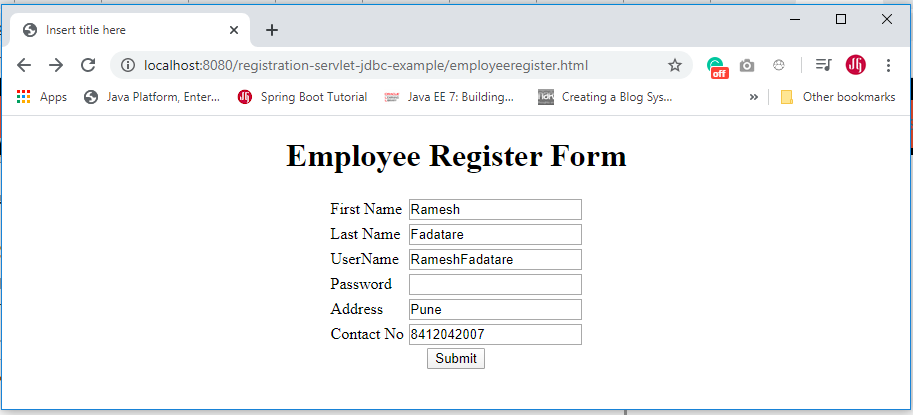
We will build a simple Employee Registration module using Servlet, JDBC, and the MySQL database. Here is the registration form:
Tools and technologies used
- IDE - Eclipse Neon.3
- JDK - 1.8 or later
- Apache Tomcat - 8.5
- Servlet - 2.5+
- MySQL - mysql-connector-java-8.0.13.jar
Development Steps
- Create an Eclipse Dynamic Web Project
- Add Dependencies
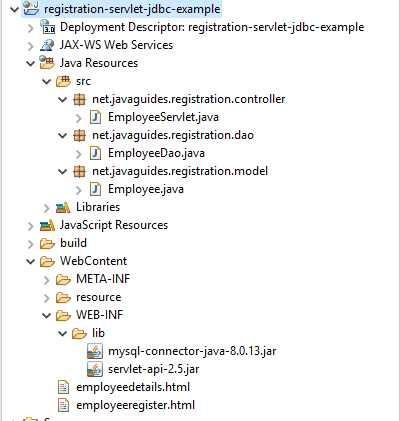
- Project Structure
- MySQL Database Setup
- Create a JavaBean - Employee.java
- Create an EmployeeDao.java
- Create an EmployeeServlet.java
- Create an employeeregister.html
- Create an employeedetail.html
- Demo
1. Create an Eclipse Dynamic Web Project
To create a new dynamic Web project in Eclipse:
1. On the main menu select File > New > Project....
2. In the upcoming wizard choose Web > Dynamic Web Project.
3. Click Next.
4. Enter project name as "registration-servlet-jdbc-example";
5. Make sure that the target runtime is set to Apache Tomcat with the currently supported version.
2. Add Dependencies
Add the latest release of the below jar files to the lib folder.
- servlet-api.2.3.jar
- mysql-connector-java-8.0.13.jar
4. MySQL Database Setup
Let's create a database named "demo" in MySQL and create an employee table using the below DDL script:
CREATE TABLE `employee` (
   `id` int(3) NOT NULL,
   `first_name` varchar(20) DEFAULT NULL,
   `last_name` varchar(20) DEFAULT NULL,
   `username` varchar(250) DEFAULT NULL,
   `password` varchar(20) DEFAULT NULL,
   `address` varchar(45) DEFAULT NULL,
   `contact` varchar(45) DEFAULT NULL,
   PRIMARY KEY (`id`)
) ENGINE=InnoDB DEFAULT CHARSET=utf8mb4 COLLATE=utf8mb4_0900_ai_ci;
5. Create a JavaBean - Employee.java
Let's create an Employee JavaBean class which we will use to create an object and populate registration data in Servlet:
import java.io.Serializable;

/**
 * JavaBean class
 * @author Ramesh Fadatare
 */
public class Employee implements Serializable {
    /**
     *
     */
    private static final long serialVersionUID = 1 L;
    private String firstName;
    private String lastName;
    private String username;
    private String password;
    private String address;
    private String contact;
    public String getFirstName() {
        return firstName;
    }
    public void setFirstName(String firstName) {
        this.firstName = firstName;
    }
    public String getLastName() {
        return lastName;
    }
    public void setLastName(String lastName) {
        this.lastName = lastName;
    }
    public String getUsername() {
        return username;
    }
    public void setUsername(String username) {
        this.username = username;
    }
    public String getPassword() {
        return password;
    }
    public void setPassword(String password) {
        this.password = password;
    }
    public String getAddress() {
        return address;
    }
    public void setAddress(String address) {
        this.address = address;
    }
    public String getContact() {
        return contact;
    }
    public void setContact(String contact) {
        this.contact = contact;
    }
}
6. Create an EmployeeDao.java
We will separate JDBC accessing code separate from Servlet. So let's create an EmployeeDao class and add the following code to it:
import java.sql.Connection;
import java.sql.DriverManager;
import java.sql.PreparedStatement;
import java.sql.SQLException;

import net.javaguides.registration.model.Employee;

public class EmployeeDao {

    public int registerEmployee(Employee employee) throws ClassNotFoundException {
        String INSERT_USERS_SQL = "INSERT INTO employee" +
            "  (id, first_name, last_name, username, password, address, contact) VALUES " +
            " (?, ?, ?, ?, ?,?,?);";

        int result = 0;

        Class.forName("com.mysql.jdbc.Driver");

        try (Connection connection = DriverManager
            .getConnection("jdbc:mysql://localhost:3306/demo?useSSL=false", "root", "root");

            // Step 2:Create a statement using connection object
            PreparedStatement preparedStatement = connection.prepareStatement(INSERT_USERS_SQL)) {
            preparedStatement.setInt(1, 1);
            preparedStatement.setString(2, employee.getFirstName());
            preparedStatement.setString(3, employee.getLastName());
            preparedStatement.setString(4, employee.getUsername());
            preparedStatement.setString(5, employee.getPassword());
            preparedStatement.setString(6, employee.getAddress());
            preparedStatement.setString(7, employee.getContact());

            System.out.println(preparedStatement);
            // Step 3: Execute the query or update query
            result = preparedStatement.executeUpdate();

        } catch (SQLException e) {
            // process sql exception
            printSQLException(e);
        }
        return result;
    }

    private void printSQLException(SQLException ex) {
        for (Throwable e: ex) {
            if (e instanceof SQLException) {
                e.printStackTrace(System.err);
                System.err.println("SQLState: " + ((SQLException) e).getSQLState());
                System.err.println("Error Code: " + ((SQLException) e).getErrorCode());
                System.err.println("Message: " + e.getMessage());
                Throwable t = ex.getCause();
                while (t != null) {
                    System.out.println("Cause: " + t);
                    t = t.getCause();
                }
            }
        }
    }
}
You can learn complete JDBC at JDBC Tutorial
7. Create an EmployeeServlet.java
Let's create an EmployeeServlet class to process HTTP request parameters and redirect to the appropriate HTML page after request data is stored in the database:
package net.javaguides.employeemanagement.web;

import java.io.IOException;

import javax.servlet.ServletException;
import javax.servlet.annotation.WebServlet;
import javax.servlet.http.HttpServlet;
import javax.servlet.http.HttpServletRequest;
import javax.servlet.http.HttpServletResponse;

import net.javaguides.employeemanagement.dao.EmployeeDao;
import net.javaguides.employeemanagement.model.Employee;

/**
 * @email Ramesh Fadatare
 */

@WebServlet("/register")
public class EmployeeServlet extends HttpServlet {
    private static final long serialVersionUID = 1 L;
    private EmployeeDao employeeDao;

    public void init() {
        employeeDao = new EmployeeDao();
    }

    protected void doPost(HttpServletRequest request, HttpServletResponse response)
    throws ServletException, IOException {

        String firstName = request.getParameter("firstName");
        String lastName = request.getParameter("lastName");
        String username = request.getParameter("username");
        String password = request.getParameter("password");
        String address = request.getParameter("address");
        String contact = request.getParameter("contact");

        Employee employee = new Employee();
        employee.setFirstName(firstName);
        employee.setLastName(lastName);
        employee.setUsername(username);
        employee.setPassword(password);
        employee.setContact(contact);
        employee.setAddress(address);

        try {
            employeeDao.registerEmployee(employee);
        } catch (Exception e) {
            // TODO Auto-generated catch block
            e.printStackTrace();
        }

        response.sendRedirect("employeedetails.html");
    }
}
8. Create an employeeregister.html
Let's design an employee registration HTML form with the following fields:
- firstName
- lastName
- username
- password
- address
- contact
<!DOCTYPE html>
<html>

<head>
    <meta charset="ISO-8859-1">
    <title>Insert title here</title>
</head>

<body>
    <div align="center">
        <h1>Employee Register Form</h1>
        <form action="register" method="post">
            <table style="with: 80%">
                <tr>
                    <td>First Name</td>
                    <td><input type="text" name="firstName" /></td>
                </tr>
                <tr>
                    <td>Last Name</td>
                    <td><input type="text" name="lastName" /></td>
                </tr>
                <tr>
                    <td>UserName</td>
                    <td><input type="text" name="username" /></td>
                </tr>
                <tr>
                    <td>Password</td>
                    <td><input type="password" name="password" /></td>
                </tr>
                <tr>
                    <td>Address</td>
                    <td><input type="text" name="address" /></td>
                </tr>
                <tr>
                    <td>Contact No</td>
                    <td><input type="text" name="contact" /></td>
                </tr>
            </table>
            <input type="submit" value="Submit" />
        </form>
    </div>
</body>
</html>
9. Create an employeedetail.html
After an employee successfully registered then this page shows a successful message on screen:
<!DOCTYPE html>
<html>
<head>
<meta charset="ISO-8859-1">
<title>Insert title here</title>
</head>
<body>
 <h1>Employee successfully registered !</h1>
</body>
</html>
10. Demo
It's time to see a demo of the above development. Deploy this web application to the tomcat server.
Employee Registration Form
Once you deploy this application successfully then hit this link into a browser - http://localhost:8080/registration-servlet-jdbc-example/employeeregister.html


Sir can i get employeeservlet.java
ReplyDeleteYes. Added missing EmployeeServlet.java class to this tutorial so you can refer now.
Delete