Go to Part 1
In this tutorial, you will learn how to build a Todo web application using JSP, Servlet, JDBC and MySQL database.
You can download the source code of this tutorial from my Github repository, the link given at the end of this tutorial.
Go to Part 1You can download the source code of this tutorial from my Github repository, the link given at the end of this tutorial.
Build Todo App using JSP, Servlet, JDBC, and MySQL - Part 3 Series
To keep it simple, I divide this tutorial into 3 parts and here are the topics that I am going to cover in each Part.
In part 1, I will cover the below topics:
User Registration Module -
1. Create a JavaBean - User.java
2. Configure JDBC Connection- JDBCUtils.java
3. DAO Layer - UserDao.java
4. Controller Layer - UserController.java
5. View Layer - register.jsp
Login Module -
1. Create a JavaBean - LoginBean.java
2. DAO Layer - LoginDao.java
3. Controller Layer - LoginController.java
4. View Layer - login.jsp
In part 2, I will cover the below topics:
- Model Layer - Todo.java
- DAO Layer - TodoDao.java and TodoDaoImpl.java
- Controller Layer - TodoController.java
- View Layer - todo-form.jsp and todo-list.jsp
- Creating an error page
3. Build a Todo App using JSP, Servlet, JDBC, and MySQL - Part 3
In part 3, I will cover the below topics:
In part 3, I will cover the below topics:
Deployment
Demo
- Add Todo
- Update Todo
- List Todo
- Delete Todo
Download Source Code.
Video Tutorial
This tutorial is explained in below YouTube channel. Subscribe to our youtube channel for more future video updates at https://www.youtube.com/c/javaguides.
Features Implementation
- Develop User registration module implementation
- Develop a Login module implementation
- Develop a Todo CRUD operations implementation
What we will build?
We build a Todo web application using JSP, Servlet, JDBC and MySQL database.
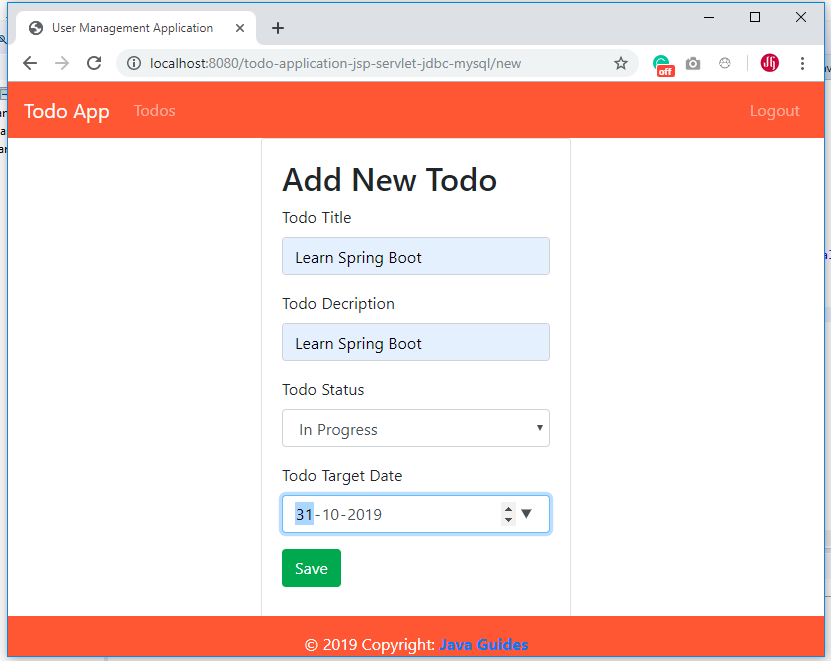
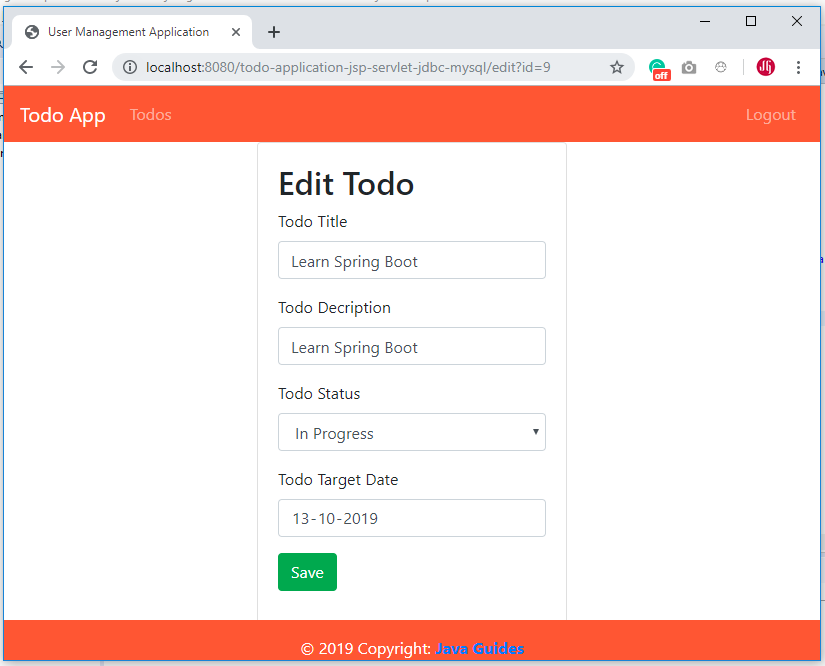
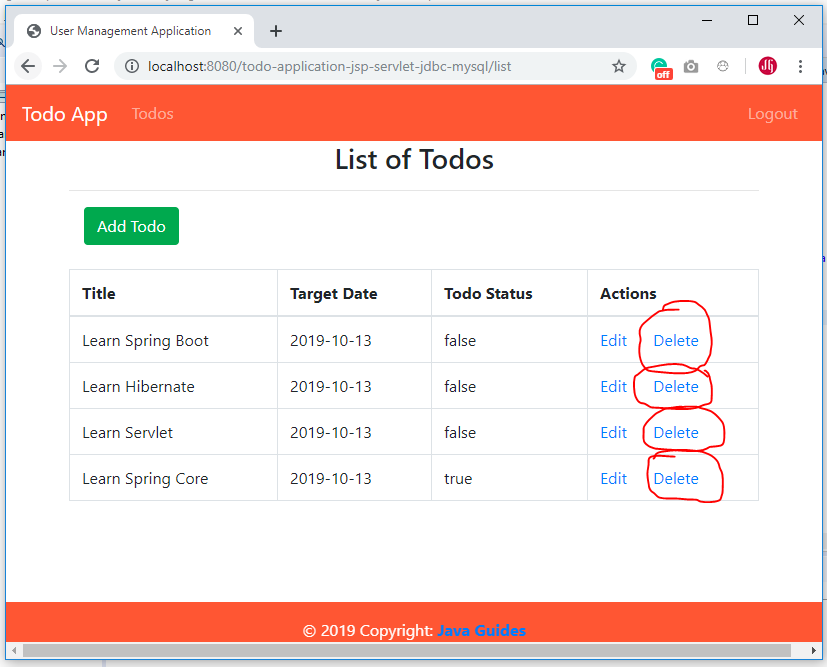
Below are the screenshots shows UI of our Todo App:
User Registration Page
Login Page
Add New Todo Page
Update Todo Page
List Todo Page
Delete Todo Page
Tools and technologies used
- JSP - 2.2 +
- IDE - STS/Eclipse Neon.3
- JDK - 1.8 or later
- Apache Tomcat - 8.5
- JSTL - 1.2.1
- Servlet API - 2.5
- MySQL - mysql-connector-java-8.0.13.jar
MySQL Database Setup
Let's create a database named "demo" in MySQL. Now, execute below DDL script:
CREATE TABLE `users` (
  `id` int(3) NOT NULL AUTO_INCREMENT,,
  `first_name` varchar(20) DEFAULT NULL,
  `last_name` varchar(20) DEFAULT NULL,
  `username` varchar(250) DEFAULT NULL,
  `password` varchar(20) DEFAULT NULL,
  PRIMARY KEY (`id`)
) ENGINE=InnoDB DEFAULT CHARSET=utf8mb4 COLLATE=utf8mb4_0900_ai_ci;

CREATE TABLE `todos` (
  `id` bigint(20) NOT NULL AUTO_INCREMENT,
  `description` varchar(255) DEFAULT NULL,
  `is_done` bit(1) NOT NULL,
  `target_date` datetime(6) DEFAULT NULL,
  `username` varchar(255) DEFAULT NULL,
  `title` varchar(255) DEFAULT NULL,
  PRIMARY KEY (`id`)
) ENGINE=InnoDB AUTO_INCREMENT=8 DEFAULT CHARSET=utf8mb4 COLLATE=utf8mb4_0900_ai_ci;
Create Dynamic Project in Eclipse
Refer this article to create a project in eclipse: Creating a Dynamic Web Project in Eclipse
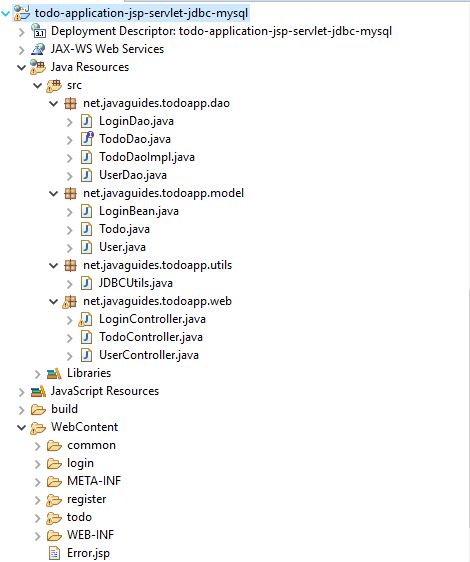
Project Structure
Once you create a dynamic project then refer below screenshot to create a project structure for Todo app:
Move to Part 1 - Registration and Login Module Implementation
In the next part, we will implement a registration and login module at Build Todo App using JSP, Servlet, JDBC, and MySQL - Part 1.


Comments
Post a Comment
Leave Comment