In this tutorial, we will learn how to create our first JavaFX application.
Before getting started, let's understand what is JavaFX and what are important features of JavaFX.
What Is JavaFX?
JavaFX is a java library for designing, creating, testing and deploying cross-platform GUI applications. It is intended to replace Swing as the standard GUI library for Java.
Features of JavaFX
Following are some of the important features of JavaFX −
- Written in Java − The JavaFX library is written in Java and is available for the languages that can be executed on a JVM, which include − Java, Groovy and JRuby. These JavaFX applications are also platform-independent.
- Using FXML - FXML is an XML-based markup language that enables developers to create a user interface (UI) in a JavaFX application separately from implementing the application logic.
- JavaFX Scene Builder - To help developers build the layout of their applications, JavaFX provides a design tool called the JavaFX Scene Builder. You drag and drop UI components to a JavaFX Content pane, and the tool generates the FXML code that can be used in an IDE such as NetBeans or Eclipse.
- Swing Interoperability − In a JavaFX application, you can embed Swing content using the Swing Node class. Similarly, you can update the existing Swing applications with JavaFX features like embedded web content and rich graphics media.
- Built-in UI controls − JavaFX library caters UI controls using which we can develop a full-featured application.
- CSS Support - Cascading style sheets contain style definitions that control the look of UI elements. The usage of CSS in JavaFX applications is similar to the usage of CSS in HTML. With CSS, you can easily customize and develop themes for JavaFX controls and scene graph objects.
- Canvas and Printing API − JavaFX provides Canvas, an immediate mode style of rendering API. Within the package javafx.scene.canvas it holds a set of classes for canvas, using which we can draw directly within an area of the JavaFX scene. JavaFX also provides classes for Printing purposes in the package javafx.print.
- Rich set of API’s − JavaFX library provides a rich set of API’s to develop GUI applications, 2D and 3D graphics, etc.
- Integrated Graphics library − JavaFX provides classes for 2d and 3d graphics.
- Graphics pipeline − JavaFX supports graphics based on the Hardware-accelerated graphics pipeline known as Prism. When used with a supported Graphic Card or GPU it offers smooth graphics. In case the system does not support graphic card then prism defaults to the software rendering stack.
Creating Hello World JavaFX application
Let's start step by step creating our first hello world JavaFX application.
The JavaFX Application Class
The JavaFX library provides javafx.application.Application class from which JavaFX applications extend. The entry point for JavaFX applications is the javafx.application.Application class.
Open an IDE of your choice, or a text editor and create a new file HelloWorld.java with the following class -
package com.javaguides.javafx.helloworld;

import javafx.application.Application;

public class HelloWorld extends Application {
}
Note that in the above example HelloWorld extends javafx.application.Application class.
Implementing start() Method
All subclasses of the javafx.application.Application class must implement the abstract start() method of the Application class (or be an abstract subclass of Application itself).
The start() method is called when the JavaFX application is started.
Here is the example from above, but with the start() method implemented:
package com.javaguides.javafx.helloworld;

import javafx.application.Application;
import javafx.stage.Stage;

public class HelloWorld extends Application {

    @Override
    public void start(Stage primaryStage) {
        primaryStage.setTitle("Hello World!");
        primaryStage.show();
    }
}
The start() method takes a single parameter of the type Stage. The stage is where all the visual parts of the JavaFX application are displayed. The Stage object is created for you by the JavaFX runtime.
The example above sets a title on the stage object and then calls show() on it. That will make the JavaFX application visible in a window with the title visible in the top bar of the window.
Adding a main() Method
You can actually launch a JavaFX application without a main() method. But, if you want to pass command line parameters to the application you need to add a main() method. In general, I prefer to add a main() method because it makes it more explicit which code launches the application.
Here is the example from above with a main() method added:
package com.javaguides.javafx.helloworld;

import javafx.application.Application;
import javafx.stage.Stage;

public class HelloWorld extends Application {

    public static void main(String[] args) {
        launch(args);
    }

    @Override
    public void start(Stage primaryStage) {
        primaryStage.setTitle("Hello World!");
        primaryStage.show();
    }
}
From the above program, the main() method calls the static launch() method with the command line parameters. The launch() method is a static method located in the Application class. This method launches the JavaFX runtime and your JavaFX application.
Adding a Scene to Stage
The previous JavaFX examples only open a window, but nothing is displayed inside this window. To display something inside the JavaFX application window you must add a Scene to the Stage object. This is done inside the start() method.
All components to be displayed inside a JavaFX application must be located inside a scene. The names for "stage" and "scene" are inspired by a theater. A stage can display multiple scenes, just like in a theater play.
Here is an example of how to add a Scene object to the Stage along with a simple Label:
package com.javaguides.javafx.helloworld;

import javafx.application.Application;
import javafx.scene.Scene;
import javafx.scene.control.Label;
import javafx.stage.Stage;

public class HelloWorld extends Application {

    public static void main(String[] args) {
        launch(args);
    }

    @Override
    public void start(Stage primaryStage) {
        primaryStage.setTitle("My First JavaFX App");

        Label label = new Label("Hello World, JavaFX !");
        label.setAlignment(Pos.CENTER);
        Scene scene = new Scene(label, 400, 200);
        primaryStage.setScene(scene);

        primaryStage.show();
    }
}
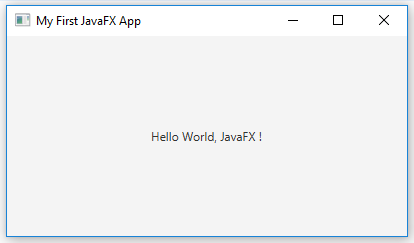
The output of the above JavaFX application:
The lifecycle of a JavaFX application
The entry point for JavaFX applications is the Application class. JavaFX runtime does the following, in order, whenever an application is launched:
1. It creates an instance of the specified Application class.2. It calls the init() method of the Application class.
3. It calls the start() method.
4. At this point, the application is visible in the foreground. The runtime waits for the application to finish. Application exits when one of the following occur -
- The app calls Platform.exit()
- The last window of the app is closed.
5. Before exiting, the stop() method of Application class is called. You can override stop()method to perform any cleanup or destroy any resources used by your application.
Here is the Complete HelloWorld example with all the Lifecycle methods -
package com.javaguides.javafx.helloworld;


import javafx.application.Application;
import javafx.geometry.Pos;
import javafx.scene.Scene;
import javafx.scene.control.Label;
import javafx.stage.Stage;

public class HelloWorldApp extends Application {

    /**
     * The application initialization method.
     */
    @Override
    public void init() throws Exception {
        super.init();
        System.out.println("Inside init() method! Perform necessary initializations here.");
    }

    /**
     * The main entry point for all JavaFX applications.
     * The start method is called after the init method has returned,and
     * after the system is ready for the application to begin running.
     */
    @Override
    public void start(Stage primaryStage) throws Exception {
        primaryStage.setTitle("My First JavaFX App");

        Label label = new Label("Hello World, JavaFX !");
        label.setAlignment(Pos.CENTER);
        Scene scene = new Scene(label, 400, 200);
        primaryStage.setScene(scene);

        primaryStage.show();
    }

    /**
     * The main entry point for all JavaFX applications.
     * The start method is called after the init method has returned,
     * and after the system is ready for the application to begin running.
     */
    @Override
    public void stop() throws Exception {
        super.stop();
        System.out.println("Inside stop() method! Destroy resources. Perform Cleanup.");
    }

    /**
     * main method to lunch the application with parameters
     * @param args
     */
    public static void main(String[] args) {
        launch(args);
    }
}
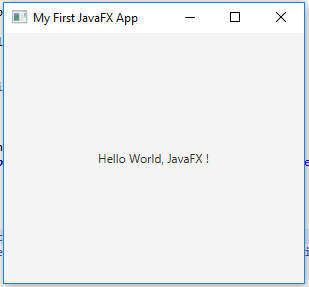
The output of the above JavaFX application:


Comments
Post a Comment
Leave Comment